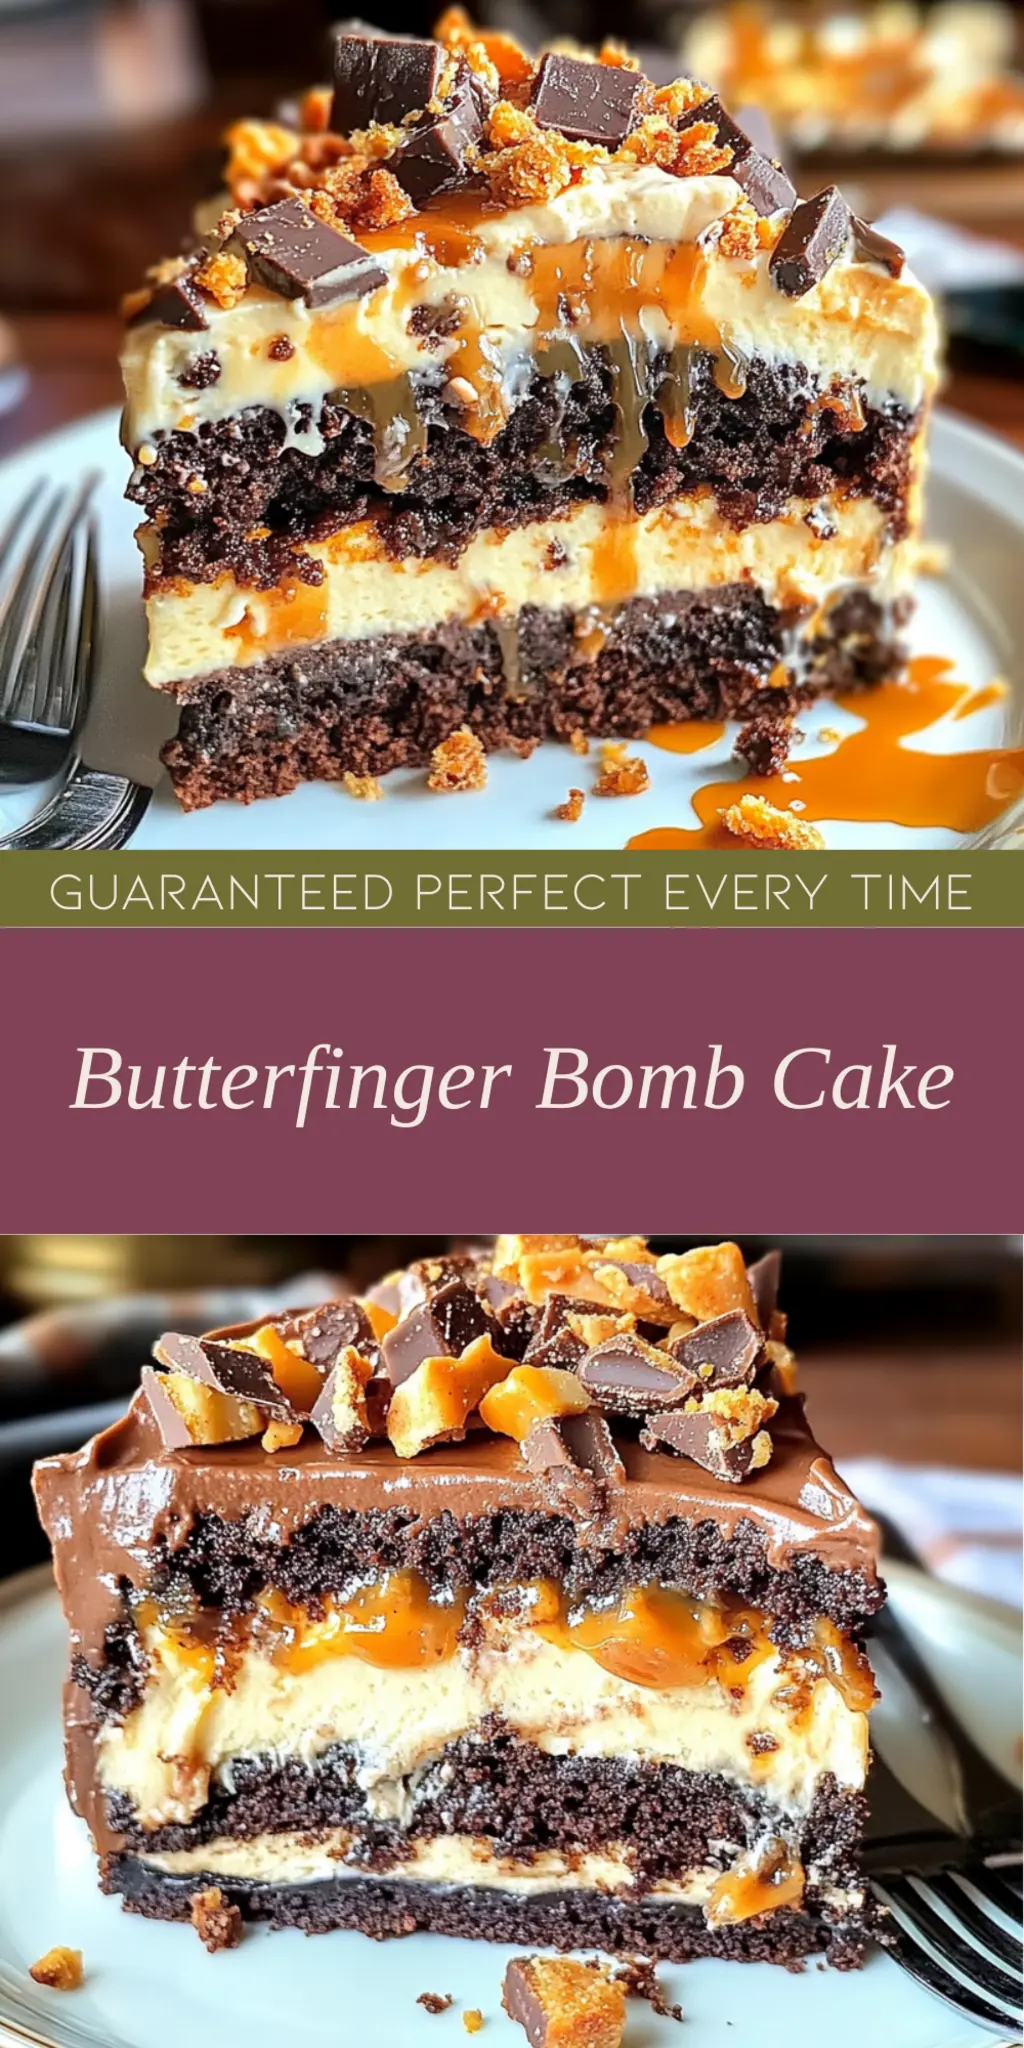
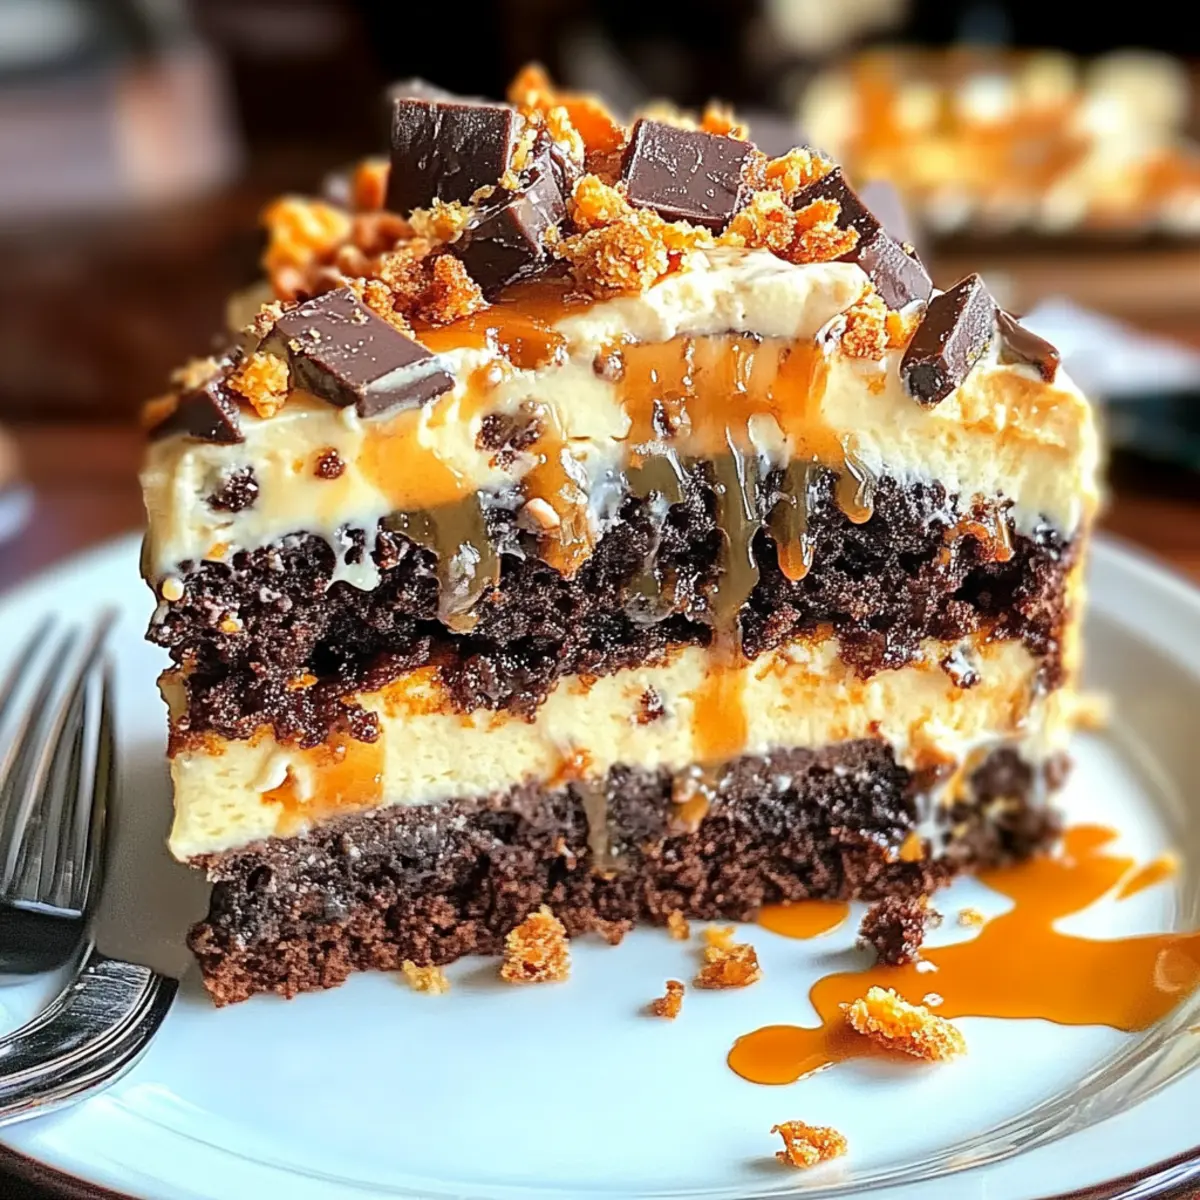
There’s a certain joy that fills the kitchen when the sweet scent of chocolate mingles with the rich, nutty aroma of peanut butter. The moment you bite into a slice of Butterfinger Bomb Cake, the world seems to melt away, offering a little slice of heaven that both kids and adults crave. I discovered this recipe one delightful afternoon while experimenting with a chocolate cake mix I had tucked away in the pantry. Who knew that a handful of fun-size Butterfinger bars could elevate a simple dessert into something truly extraordinary?

Jump to:
- Why will you love <strong>Butterfinger Bomb Cake</strong>?
- <strong>Butterfinger Bomb Cake Ingredients</strong>
- How to Make Butterfinger Bomb Cake
- What to Serve with <strong>Butterfinger Bomb Cake</strong>?
- Make Ahead Options
- <strong>Butterfinger Bomb Cake Variations</strong>
- How to Store and Freeze Butterfinger Bomb Cake
- Tips for the Best Butterfinger Bomb Cake
- Butterfinger Bomb Cake Recipe FAQs
With layers of moist chocolate cake and a silky peanut butter frosting, this cake is not just dessert; it’s a bold statement of flavor that’s surprisingly easy to master. If you’re tired of the same fast-food routine and looking for a home-baked treat that brings everyone to the table with smiles, look no further! This Butterfinger Bomb Cake not only satisfies that sweet tooth but also has the power to turn ordinary moments into memorable celebrations. So, preheat your oven and let’s dive into this indulgent creation that’s bound to become a family favorite!
Why will you love Butterfinger Bomb Cake?
Irresistible sweetness meets decadent chocolate: This cake layers chocolate cake with creamy peanut butter frosting, creating an unforgettable flavor fusion.
Easy to make: Using a boxed cake mix, you can whip up this showstopper in just 1.5 hours—perfect for busy bakers!
Kid-approved delight: It’s a guaranteed hit with kids and adults alike, making it ideal for parties or family gatherings.
Visual treat: Its stunning layers and festive toppings make for an eye-catching centerpiece!
Customizable joy: Add extra toppings or experiment with different candies for a unique twist every time.
Butterfinger Bomb Cake Ingredients
For the Cake
• Chocolate cake mix – a convenient base that gives a rich chocolate flavor.
• Water – check the cake mix instructions for the right amount to ensure perfect consistency.
• Vegetable oil – adds moisture, resulting in a tender cake.
• Eggs – these bind the ingredients together and help the cake rise.
For the Frosting
• Butter – softened for easy mixing, it provides creaminess to your frosting.
• Creamy peanut butter – adds a luscious texture and a burst of nutty flavor to the frosting.
• Powdered sugar – sweeten things up and gives the frosting its velvety smoothness.
• Heavy cream – helps create a light and fluffy frosting that spreads beautifully.
• Vanilla extract – a splash enhances the overall flavor profile.
• Salt – brings out the sweetness and balances the flavors.
For the Topping
• Crushed Butterfinger bars – these add a delightful crunch and a punch of chocolate-peanut butter goodness to the cake.
This Butterfinger Bomb Cake promises a delightful experience that will leave your family and friends asking for seconds!
How to Make Butterfinger Bomb Cake
-
Preheat your oven to 350°F (175°C) and grease two 9-inch round cake pans with flour to ensure easy release after baking. This preparation step will set the foundation for our delicious cake!
-
Prepare the chocolate cake mix by following the package directions, adding the specified amount of water, vegetable oil, and eggs. Divide the batter evenly between the prepared pans, ensuring they bake evenly for that moist texture.
-
Bake for 25-30 minutes or until a toothpick inserted in the center comes out clean. Once done, cool the cakes in the pans for 10 minutes, then turn them out onto wire racks to cool completely.
-
For frosting: Beat the softened butter and creamy peanut butter together in a bowl until smooth and fluffy, which should take about 2 minutes. This will create the base for our rich frosting.
-
Gradually add the powdered sugar, one cup at a time, mixing well after each addition. This will create a sweet, fluffy frosting that spreads like a dream!
-
Add the heavy cream, vanilla extract, and salt to the frosting mixture, then beat on medium-high speed for 3-4 minutes until light and fluffy. This is the moment where all the flavors unite!
-
Place one cake layer onto your serving plate, then spread one-third of the frosting over the top. Sprinkle half of the crushed Butterfinger bars on top for that delightful crunch!
-
Top with the second cake layer and frost the top and sides with the remaining frosting, ensuring every inch is covered in peanut buttery goodness.
-
Press the remaining crushed Butterfinger pieces onto the top and sides of the cake, creating a festive look and extra crunch.
-
Refrigerate the cake for 30 minutes before serving, allowing the frosting to set for easier slicing. This step also enhances the flavor blend!
Optional: Garnish with whole Butterfinger bars for a stunning presentation!
Exact quantities are listed in the recipe card below.
What to Serve with Butterfinger Bomb Cake?
When the sweet scent of cake fills the air, it’s time to consider delightful companions that elevate your dessert experience.
- Vanilla Ice Cream: A classic pairing, the creamy, cool essence of vanilla ice cream beautifully complements the rich chocolate and peanut butter flavors.
- Fresh Berries: Juicy strawberries or raspberries offer a tart contrast, cutting through the sweetness while adding a pop of color.
- Chocolate Sauce Drizzle: A warm chocolate drizzle enhances the indulgence, creating a decadent experience that no chocoholic can resist.
- Salted Caramel Sauce: The sweet and salty combination of caramel sauce adds depth, accentuating the cake’s layered flavors.
- Peanut Butter Cookies: Serve alongside chewy peanut butter cookies for a delightful theme that brings out the cake’s nutty notes.
- Nutty Trail Mix: For a crunchy contrast, a side of nutty trail mix introduces textures that complement the cake’s softness.
Pairing these delightful treats enhances your Butterfinger Bomb Cake experience, inviting everyone to savor every sweet moment together.
Make Ahead Options
These Butterfinger Bomb Cake layers are perfect for meal prep! You can bake the chocolate cake layers up to 3 days in advance; simply allow them to cool completely, then tightly wrap them in plastic wrap and refrigerate to keep their moisture intact. The frosting can also be prepared ahead and stored in an airtight container in the refrigerator for up to 1 week. When you’re ready to assemble and serve, bring the frosting to room temperature for easy spreading, then layer the cakes and frost as directed. This makes serving a deliciously indulgent dessert a breeze on busy nights while ensuring the cake remains just as delightful!
Butterfinger Bomb Cake Variations
Feel free to put your own twist on this delightful cake and elevate its flavors!
-
Gluten-Free: Substitute gluten-free chocolate cake mix for a deliciously accommodating version without sacrificing taste.
-
Nut-Free: Swap creamy peanut butter for a sunflower seed butter or tahini to cater to nut allergies while keeping it tasty.
-
Dairy-Free: Use plant-based butter and almond or coconut milk for a creamy frosting that everyone can enjoy, no dairy needed!
-
Banana Twist: Mash 1 ripe banana into the batter for added moisture and a subtle fruitiness that pairs beautifully with chocolate.
-
Spicy Kick: Incorporate a teaspoon of cayenne pepper or a sprinkle of chili powder into the cake mix for a surprising heat that enhances the sweetness.
-
Chocolate Chips: Mix in a cup of semi-sweet chocolate chips into the batter for extra chocolaty bursts in every slice, making this cake even more decadent.
-
Extra Crunch: Add chopped nuts or crushed pretzels into the frosting for a delightful crunch, making every bite exciting and varied.
-
Layer of Love: Create a layered effect by alternating layers of vanilla cake or red velvet between the chocolate layers, offering a visually stunning and flavorful surprise.
How to Store and Freeze Butterfinger Bomb Cake
Fridge: Store leftover Butterfinger Bomb Cake in an airtight container in the fridge for up to 3 days to keep it fresh and delicious.
Freezer: Wrap individual slices tightly in plastic wrap, then place them in a freezer-safe bag. The cake can be frozen for up to 2 months.
Reheating: To enjoy a slice of frozen Butterfinger Bomb Cake, simply thaw it in the fridge overnight and bring it to room temperature before serving.
Topping Freshness: For best results, sprinkle any remaining crushed Butterfinger bars on top just before serving to keep that delightful crunch!
Tips for the Best Butterfinger Bomb Cake
-
Proper Cooling: Allow your cakes to cool completely on wire racks before frosting. If they are warm, the frosting may melt and slide off.
-
Butter Temperature: Ensure your butter is softened but not melted for the frosting. This helps achieve a light and fluffy texture without compromising flavor.
-
Frosting Consistency: If your frosting is too thick, add a splash more heavy cream to achieve your desired spreadability. A well-balanced frosting complements the Butterfinger Bomb Cake perfectly!
-
Measurements Matter: Use exact measurements for both the cake and frosting ingredients. Too much powdered sugar may make the frosting grainy, so keep it light and airy.
-
Layer Evenness: When dividing the cake batter, aim for even amounts in each pan to prevent uneven baking. This ensures a balanced Butterfinger Bomb Cake that rises nicely!
Butterfinger Bomb Cake Recipe FAQs
What type of Butterfinger bars should I use?
Absolutely! I recommend using fun-size Butterfinger bars for that perfect blend of chocolate and peanut butter. Their small size makes them easy to crush and disperse throughout the cake. If you’re looking for a less sweet option, mini Butterfinger bars can also work wonderfully!
How should I store leftover Butterfinger Bomb Cake?
You can store any leftover Butterfinger Bomb Cake in an airtight container in the fridge for up to 3 days. Make sure it’s well-sealed to maintain its moistness and flavor. I often place a piece of parchment paper between the cake and the lid to help keep the frosting intact!
Can I freeze Butterfinger Bomb Cake?
Certainly! To freeze your Butterfinger Bomb Cake, wrap individual slices tightly in plastic wrap, then place them in a freezer-safe bag. It can be frozen for up to 2 months. To thaw, just pop it into the fridge overnight and allow it to come to room temperature before serving. Simple as that!
What should I do if the cake layers are domed or uneven?
If your cake layers come out domed, don’t worry! You can level them easily with a serrated knife. Just let the cakes cool completely, then carefully trim off the domed tops to create a flat surface. This will ensure your Butterfinger Bomb Cake has a beautiful, stable layer for frosting!
Can my dog eat Butterfinger Bomb Cake?
Absolutely not! Your pup should not eat Butterfinger Bomb Cake as it contains chocolate and peanut butter, which can be toxic to dogs in certain amounts. Always keep human treats away from pets to ensure their safety!
What should I do if my frosting is too thick?
If your frosting turns out too thick, don’t despair! You can add a splash of heavy cream, mixing well until you achieve your desired consistency—aim for a smooth and spreadable texture. Take it slow with the cream; a little goes a long way!
Indulgent Butterfinger Bomb Cake: A Sweet Slice of Heaven
Ingredients
Equipment
Method
- Preheat your oven to 350°F (175°C) and grease two 9-inch round cake pans with flour.
- Prepare the chocolate cake mix by following the package directions and divide the batter evenly between the prepared pans.
- Bake for 25-30 minutes or until a toothpick inserted in the center comes out clean. Cool the cakes in pans for 10 minutes before transferring to wire racks.
- Beat the softened butter and peanut butter together in a bowl until smooth and fluffy.
- Gradually add the powdered sugar, mixing well after each addition.
- Add the heavy cream, vanilla extract, and salt, then beat on medium-high speed for 3-4 minutes until light and fluffy.
- Place one cake layer onto your serving plate, then spread one-third of the frosting over the top. Sprinkle half of the crushed Butterfinger bars on top.
- Top with the second cake layer and frost the top and sides with the remaining frosting.
- Press the remaining crushed Butterfinger pieces onto the top and sides of the cake.
- Refrigerate the cake for 30 minutes before serving.